
We tell you how to create blogs with Middleman for static sites
In March, we decided to move our site from Jekyll to Middleman just because of the capabilities it provides for blog development. Even though Jekyll is blog-aware, we were more comfortable with ERB based site generators, so we chose Middleman. There was a bit of a learning curve but we believe that we have mastered Middleman in all its glory. We are happy to share all the things that got us hooked and areas where we had to implement new solutions. (This is going to be a long post, so it’s split into multiple parts. Feel free to skip over if you think you know the basics)
So what is Middleman?
Build static websites with an easy-to-use framework. Middleman is a static site generator using all the shortcuts and tools in modern web development.
That is the official description for Middleman on their website. Middleman can be used for generating static websites quickly. Say that you need a blog that needs to be updated with a blog post daily - then you can create a blog loop with Middleman and write your blog post with Markdown and it will be updated automatically. Middleman is quite literally the middle guy who compiles your content and creates the respective web pages.
Where can you start now?
If you are ready to start coding with Middleman you can learn the basics very well by using the Middleman official installation instructions. Quite simply it is,
$ gem install middleman
If middleman is successfully installed you can now initialize your project using,
$ middleman init
and you can start your server with,
$ middleman server
you can build your files with,
$ middleman build
And that’s it, this will hopefully start an empty project with Middleman in it. But while we were developing our website we found that using only Middleman is not enough so we tied it with Gulp, as we have already used Gulp for a lot of projects. Gulp is mainly used here for two reasons: BrowserSync and Javascript Bundling. I was thinking about open sourcing our Gulp config, but I don’t have the patience to do the documentation for it properly. However, there are a lot of starter kits for this and I personally recommend middleman-gulp for your project. This project has compiled your assets using both Middleman and Gulp, like this:
| Middleman | Gulp |
|---|---|
| HTML Templating | |
| Minify HTML | |
| Gzip Files | |
| Preprocess CSS | |
| Minify CSS | |
| Minify Javascript | |
| Sourcemaps | |
| Autoprefixer | |
| Bundle JavaScript | |
| Compress Images | |
| Copy web fonts | |
| Browser Reload |
This is great for starting with Middleman, although I also recommend this extension for working SVG Sprites.
If you are using that extension you can start your server using,
$ bundle exec middleman server
and build that files using,
$ bundle exec middleman build
Now it’s time to start development
Once you’ve completed all the set up that is required you can move on to develop using it. But first a note about the organization in our code.
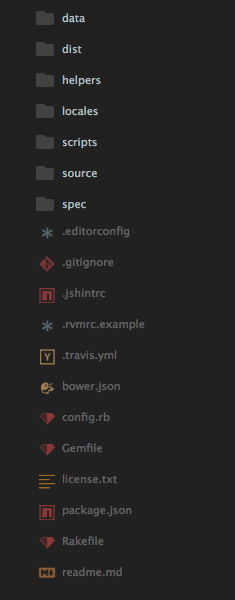
This is an example of a middleman file organization where the data folder has all the JSON or YAML files which are used to store variables that are used during compilation. We also have the assets folder with helpers which is in Ruby’s ERB. The source folder has all our files that are HTML, Markdown, and others. The config.rb file and Gemfile have all the particular information about the configuration of our project. Note that this particular example doesn’t have any Gulp configuration. If we include Gulp there will be another Gulp folder.
And in the source folder:

This is an example for a new middleman site with a blog. The important folder here is the layouts folder which will have several layouts for different types of pages. Each page would have unique Frontmatter items that are used to give page specific conditions. For example,
---
layout: layoutdark
title: "Skcript | A Design & Artificial Intelligence Consulting Company serving customers Worldwide."
description: "Skcript is a unique worldwide product-first, design and artificial intelligence consulting company. Work with us."
image: "/images/painter.jpg"
---
This is the Frontmatter that we give to our main index page in which we can specify our dynamic content for the specific page.
config.rb
The config.rb is one of the important files on our site because we specify all the configuration and extensions in this file. We can also define our helpers here too. Here we give the conditions for the blog loop and for almost all the extensions, like this:
activate :directory_indexes

activate :livereload

activate :asset_hash, :ignore => [/^images/, /^svrmedia/]

activate :sitemap_ping do |config|
  config.host = 'https://www.skcript.com'
end

activate :blog do |blog|
  blog.prefix = "svr"
  blog.permalink = "{title}"
  blog.sources = "{year}-{month}-{day}-{title}.html"
  blog.summary_separator = /\(MORE\)/
  blog.paginate = true
  blog.page_link = "{num}"
  blog.per_page = 9
  blog.layout = "svr_layout"
  blog.new_article_template = File.expand_path('new_article.markdown.erb', File.dirname(__FILE__))
end
And then we style ’em
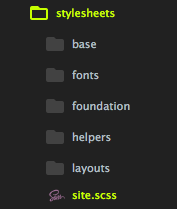
We use SASS for easy compilation to CSS, here we use a modular method where we import everything into site.scss which in turn complies into site.css into our stylesheets folder
@charset 'UTF-8';

// Global Config Variables
@import "helpers/mixins";
@import "base/interuifont";
@import "base/binary";

// Foundation
@import "foundation/foundation";

// Helpers
@import "helpers/mixins";
@import "helpers/helpers";

// Header and Footer
@import "base/header";
@import "base/footer";

// Layout
@import "layouts/l-index";
@import "layouts/l-landing";
@import "layouts/l-careers";
@import "layouts/l-team";
@import "layouts/l-post";
@import "layouts/l-contact";
@import "layouts/l-products";
@import "layouts/l-services";
@import "layouts/l-press";
@import "layouts/l-company";
@import "layouts/l-values";
@import "layouts/l-casestudy";
@import "layouts/l-404";
@import "layouts/l-otherpages.scss";
@import "layouts/l-singleproduct";
This is the example which is used on our site to import stylesheets from modular stylesheets. And that’s it! If you don’t know about SASS I strongly recommend you to learn about it.
The Power of Partials
Partials is available to us so that we don’t repeat our code more than once. For example, if we have a partial named _hiring.html.erb which contains,
<section class="HiringSectionv1">
  <div class="hiring-text">
    <h4>JOIN US NOW</h4>
    <h1>We're hiring</h1>
  </div>
  <a href="/careers/" class="p-4 bg-gray-100 rounded">Apply Now</a>
</section>
We can call that by simply using,
<%= partial "partials/hiring" %>
By using partials we have the power to not repeat portions of code. If we need the same piece of code we can simply call the same line so that repetition of the same piece of code more than one time doesn’t occur.
There is an extension for that!
Middleman has a large number of customizable extensions that can be used in our projects. Most of these extensions are super helpful and will make our jobs much easier, so be sure to check them out!
And one more thing!
Before we go on to Part 2 of this post, I just wanted to say that there is lot of stuff you could do with Middleman. I started out trying to make templates with Middleman, you should definitely check that out! There are lots of cool things that you can do with Middleman. I can’t wait to see what you do with it, let your imagination run free!
Part 2 : Accelerated Mobile Pages (AMP) using Middleman!
Up next
Build your own Google Assistant Bot for your Firebase project Today